
We took a nice long trip to visit my family over Thanksgiving. I hope you enjoyed your holiday, we did. Your regularly scheduled blogging resumes tomorrow.
Kid ‘n Ewe…
…and children, too! Yes, that’s right, today Max, Charlie and I made the trek to Kid ‘n Ewe, marking my very first fiber festival! I think the expressions on the boys’ faces really says it all about their attitude towards this particular event.

Awww. They were kind of excited. Mostly to get out of the car. We got lost in Boerne and spent an extra thirty minutes trying to find the fairgrounds. So we moved them from their carseats into the portable two-person baby prison and they felt a little better. Once we got inside, I think I must have lost my head, because I only have one more photo from the entire thing:

Yup. Those are alpaca ‘tocks. We got to pet alpaca! (They were soft.) Max kept trying to pat them on the bum, the one place the woman leading them said would get you kicked in the face. Yup. It was quite the experience, though – we went into the first building after staying a while to listen to the musicians playing the dulcimer out front. The whole place was full of yarn, and fiber, and books and needles and patterns and beads – the whole building smelled like sheep. There were probably 15 women at the back of the building, spinning (they were having a class). Max was fascinated by the wheels, even more so when I told him they were making yarn.
We went from there into the next building, stopping briefly to ogle the angora bunnies outside. In there we found Melanie at the Yarnivore booth and chatted for a while. They gave Max and Charlie each a chunk of unspun angora to pet – apparently at a fiber festival they hand out chunks of fiber like tootsie rolls (at least to little children). In the next booth over a very nice old man handed them each a chunk of wool about a foot long to play with while he gave me tips about how to get started with a drop spindle. I think I’m going to make one and mess around with it. I saved the fiber from my boys when they got bored with it, I thought I’d start on that.

Also in the second building was Amanda! She had a little box full of Ravelry nametags for any Ravelers who came by – and boy, there were a lot of us! It seemed like everywhere you turned you saw a little green and white tag, or a beta tee. It was fun to meet some people I’d only seen online, and it was cool to meet some new people too. We picked up something else at Amanda’s booth, too –

a set of size 5 Chiaogoo bamboo needles, perfect for some nice, thick socks. In the third building (the alpaca building, apparently) the free sampleage for the kiddos continued. The nice woman at the Tierra Prometida booth (that means ‘promised land,’ incidentally – and I figured that out before I went to their site. Woohoo for high school Spanish!) had a rack of little knitted finger puppets that were just adorable and gave the boys each one. Check it out:

She picked two that were the same (she obviously has children). I think it’s cute that one of them is smaller than the other one – big brother, little brother.  I have an urge to make up a third one, and a troll, so we can act out the 3 Billy Goats Gruff. It was here that I picked up a 4oz skein of undyed alpaca with unknown yardage. Pretty!

And the boys had had just about enough and started to howl. We headed back out of the building, but I stopped to pick up a back issue of Interweave Knits –

The top on the cover has really grown on me, and I’d just decided to be on the lookout for it yesterday. And there it was! That’s really only important because it spurred me to stop by the Brooks Farm booth again. We’d spent a good chunk of time there earlier, but I’d left empty-handed because I couldn’t convince myself that I knew what I would do with anything I bought there. With pattern in hand, though, I picked up three skeins of the green Acero I’d been sighing over.

Crazy pretty. I really hope that I worked it out carefully enough to be able to use it for this pattern, but it’s entirely possible that I’m deluding myself with the strength of my love for this yarn…
So. Um. No yarn shopping for a while.
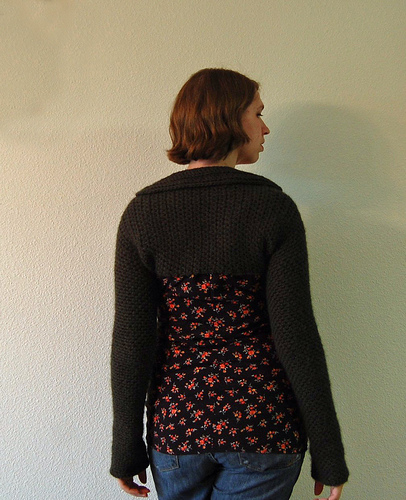
English Garden Shrug
I finished the project I was working on with the Baby Alpaca Brush – it was mostly finished before we took our trip to Colorado, but I didn’t think it would be very good to work on in the car, since I needed to keep trying it on to judge the length. It’s finished now, though, and I like it. It’s warm and soft and fuzzy. It reminds me of hedges, cool cloudy weather, and good literature – hence the name. (It makes sense to me, anyway.)
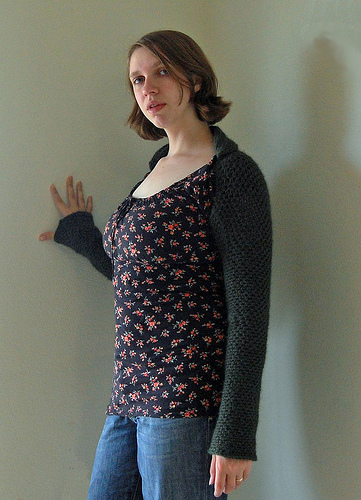
The shrug is worked from cuff to cuff in the round, so the only seaming involved is attaching the collar. Instead of just being a long straight tube, a little bit of shaping is used to get a better fit and to eliminate the bumpy, bulging back that you see so often with simple shrugs. I don’t feel like writing up a proper pattern for it, but I thought I’d share some guidelines that will allow you to make one of your own.
Materials:
- 5 balls Plymouth Baby Alpaca Brush, [80% Baby Alpaca, 20% Acrylic, 110 yds per 50g ball]
- J/6mm hook
- Yarn needle
- Safety pins or stitch markers
When you begin, be sure to take notes so that you can make the second sleeve match the first! Start by making a chain long enough that when you join it into a circle, if you push it up on your arm like a bracelet it fits up your arm and stops at your elbow. (My number was 35 ch.) To accommodate the pattern stitch, be sure you use an odd number of chains.
Join, ch 2, and hdc in every st around. Join rnd.
Ch 1, sc in next st, *ch 1, sk 1 st, sc in next st. Repeat from * around. When you reach the end of the round (the first and last stitches should both be sc), **ch1, skip next sc, sc in next chain space. Repeat from ** around in a continuous spiral until sleeve measures desired length from wrist to elbow. (It’s a good idea to measure and mark down the length of this section, even put in a stitch marker for later.)
At this point, increase until sleeve can continue comfortably up your arm. (I made 3 increases. Be sure to mark down how many increases you made so that you can mirror them on the other side with decreases.) Increase by making [sc, ch 1, sc] in a chain space. Stack your increases by increasing in the ch-space formed in the previous increase. Only make one increase per round to avoid creating strange bumps. Insert stitch marker.
Continue in pattern until your sleeve reaches the bicep. Increase as described previously until sleeve can go comfortably over bicep and shoulder. (I made 10 increases here: be sure to make a note of how many increases you did.)
Begin working back and forth, leaving a few stitches (I used 3) unworked to create some space between the edges. Work in pattern for about 1 1/2″; any time the pattern stitch would have you begin or end a row with a ch, substitute a sc. Choose one side to be the neck edge, and one side to be the back edge. Begin decreasing at back edge as follows: insert hook in ch-space, pull up loop. Insert hook in next ch-space, pull up loop. Yarn over, pull loop through all loops on hook. Make a decrease in this manner every row along ‘back’ edge until (when you try it on) the end of the row has come out from under your armpit to sit on your back. Make note of the number of decreases (I made 6), insert stitch marker.
Work even in pattern until reaching the place on the opposite shoulder that mirrors where you placed the last marker (be careful, it’s easy to make this part too long) and increase along ‘back’ edge as previousy explained to match your decreases. Work even about 1 1/2″, chain the same number of stitches you skipped before, and join your work. You should now have the same number of stitches as you did before you split your round.
Work 1 round in pattern, decrease as previously described to match the bicep increases on the other side. Work straight until you reach the place equivalent to the stitch marker on the other arm (just above the elbow), decrease to match elbow increases. You should now have the same number of stitches as you began with; work straight in pattern until second sleeve is about 1/4″ shorter than first sleeve. Join with a slip stitch, ch 2, hdc around, join rnd. Finish off.
Collar:
Row 1: Ch 32, make 2 hdc in 3rd ch from hook. Hdc across, make another hdc in last ch. (32 sts) Turn.
Rows 2-5: Ch 2, hdc inc 2x. Hdc across until 2 sts remain, hdc inc 2x. Turn.
Row 6: Sl st 3, sc inc, hdc inc, hdc across until 5 sts remain. Hdc inc, sc inc, sl st. Turn, leaving remaining sts unworked.
Row 7: Do not ch, skip sl st, sl st 2. Sc inc, hdc 38, sc inc, sl st in next st. Turn.
Row 8: Skip sl st, sl st 3. Sc, hdc 32, sc, sl st. Finish off.
Center collar on neck edge, and sew flat side of collar to neck edge. Weave in all ends.
And that’s it! I hope someone finds this useful.