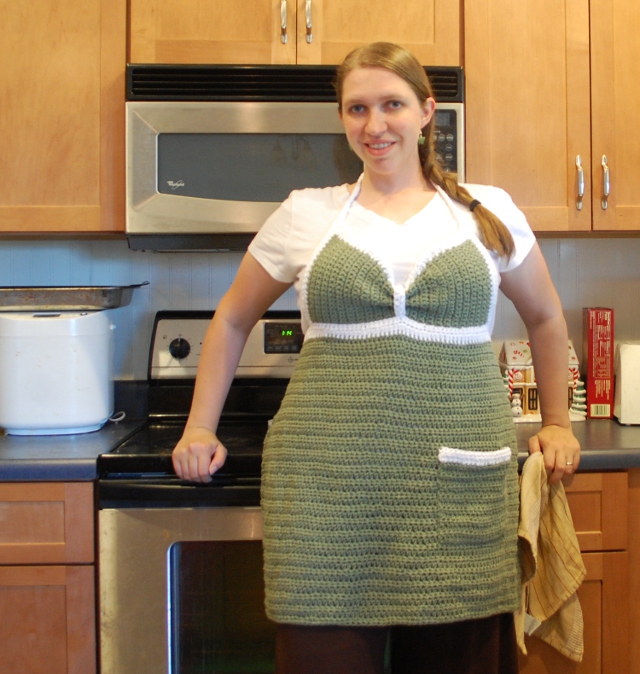
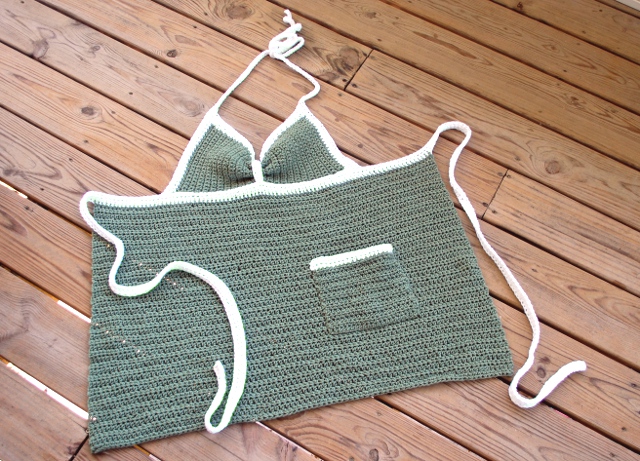
So, when I crocheted all the way through the first ball of thread in that yellow project I was working on, I decided to take a break. Which, in my mind, apparently means going out and buying a cone of kitchen cotton. Because you know what? Nothing says “quick, easy project” like a full-sized apron. Right?

I’ve got a serious lack of fun aprons around here. For as much time as I spend in the kitchen, you’d think I’d have a few. After a few weeks of wearing the same pink apron every day, I decided that it would be reasonable, practical, and not really that difficult to crochet one.

It’s not this color in person…it’s a much nicer, much prettier avocado green. Neither my camera skills nor my GIMP skills were able to correct it. Oh, well. I still think it’s crazy cute for an apron. Don’t you?
Kitchen Couture Apron
Size: One size fits most. I based the measurements off of an apron I had purchased.
Materials
- Peaches & Creme [100% Cotton, 690yds/630m per 14oz/396g cone] 1 cone Avocado (MC)
- Peaches & Creme [100% Cotton, 122 yds/112m per 2.5oz/70g skein] 1 skein White (CC)
- H/8 (5.00mm) hook
- Yarn needle
Note: I didn’t use the whole cone, and by my calculations you may be able to get away with using 5 skeins instead. I like the cone because I don’t have to weave in so many ends, though!
Directions:
Bodice
Row 1: With MC, ch 21. Sk 1 st, sc across. (20 sc) Turn.
Rows 2-17: Ch 1. Sc in each st across. Turn.
Row 18: Ch 1. [Sc in next st, sc dec across next 2 sts] 3 times. Sc across to end. (17 sc) Turn.
Row 19: Ch 1. Sc in each of the first 8 sts. [Sc dec across the next 2 sts, sc in next st] 3 times. (14 sc) Turn.
Row 20-29: Ch 1. Sc in each st across. (14 sc) Turn.
Row 30: Ch 1. [Sc in next st, sc inc in next st] 3 times. Sc across. (17 sc) Turn.
Row 31: Ch 1. Sc in each of the first 11 sts. [Sc in next st, sc inc in next st] 3 times. (20 sc) Turn.
Rows 32-47: Ch 1. Sc across (20 sc) Turn.
Row 48: Ch 1. Sc across. Finish off.
Bodice Edging
Row 1: Working on top/curved edge of bodice, join CC at corner. Ch 2. Placing 1 st in each row across, hdc 17, sc 14, hdc 17. Turn.
Row 2: Ch 2. Hdc in the first 17 sts, sc in the next 14, hdc in the last 17 sts. Finish off.
Top Ties
Row 1: With CC, join at bottom edge of bodice (to work up side). Ch 2. Hdc in each stitch up to Bodice Edging (20 hdc); place 2 hdc in each row of hdc (4 more). Ch 77, turn.
Row 2: Sk 2 ch. Hdc in each ch (75) and hdc (24) across. (99 hdc) Finish off: repeat for other side of bodice.
Side Ties
Row 1: With CC, LOOSELY ch 121. Place 2 sl st in each row of Top Tie (4 sl st). Place 1 sl st in each row of Bodice (on the FLAT side – 48 sl st). Place 2 sl st in each row of Top Tie on other side. Ch 123. (300 sts)
Row 2: Sk 2 ch. Hdc in each ch and sl st across. (298 hdc) Turn.
Row 3: Ch 2, hdc across. Finish off.
Skirt
Row 1: With MC, skip 105 sts of Side Ties and join yarn. Ch 2; hdc in same st and each of the next 87. (88 hdc) Leave remaining stitches unworked: turn.
Rows 2-43: Ch 2; hdc across. Turn.
Row 44: Ch 2; hdc across. Finish off.
Bodice Detail
Row 1: With CC, ch 12. Sk 2 ch; hdc in remaining ch across. (10 hdc) Turn.
Row 2: Ch 2; hdc across. (10 hdc) Finish off.
Row 1: With MC, ch 22. Sk 2 ch; hdc across. (20 hdc)
Rows 2-14: Turn; ch 2. Hdc across. (20 hdc)
Row 15: Switch to CC, finish off MC. Turn. Ch 2; hdc across.
Row 16: Turn. Ch 2, hdc across. Finish off.
Finishing
- Use Bodice Detail to gather Bodice in the center. Sew one end of Bodice detail to front (where Bodice meets the Side Ties), bring it over the top, and sew the other end to the place where the Bodice meets the Side Ties on the inside.
- Sew pocket to desired place, leaving white side (at top) unsecured so you can get your hand in there. 😉
- Weave in all ends. Enjoy!

Wow! This is so lovely! How did you learn to do this? I don’t even know how to stitch so I’m envious right now.
Thanks for sharing!
-Camille
Very cute! I would have never thought to crochet a kitchen apron.
I love this pattern. It covers things that always seems to get splattered on when I’m cooking. I’m going to go and get some more supplies so I can make some for gifts for my female friends who have the same problem.
on row 30 of the top is it sc in first stitch the 2 sc in next stitch? as it reads the st count wouldn’t work out right thanks so much!
The ‘inc’ stands for increase which means to make 2 sc in one stitch.
Just finished it! Turned out pretty cute- although a bit short. However, I am tall. I did modify it a bit for the bodice because the stitches didn’t add up like Melanie stated, but I really love it. Thanks!
I love this pattern, I’m going to make one for my 2 daughter’s, my daughter in-law, my 2 sisters, my mom and my 6 granddaughter’s for our annual baking and pierogi making session. ( Thank goodness I have till thanksgiving.
Hello Melissa, I love it! I am going to make one for my self, Thank you for sharing. And I LOVE that you are homeschooling, I am too! 3 boys! It is quite an adventure!.