I’m not a fan of heavy Photoshopping, and to most of the pictures I take I don’t do anything at all. For special photos, though – ones that are going to be blown up and hung on the wall, or sent out to family, or published on my blog or in patterns, I want them to look extra nice. Usually it only takes a few extra tweaks to make them better without losing their genuine qualities.
All of the directions given are for GIMP, a free open-source Image Manipulation Program. It’s just as powerful as Photoshop (except, you know, free) but there’s a bit of a learning curve – especially if you’re switching over from another program. Fortunately the internet is just teeming with step-by-step tutorials to help you get a handle on it. So, here’s how to use GIMP to help you fix your photos.
White Balance
Here’s the deal: different light sources tinge your pictures different colors. Late afternoon sun might make everything look yellow, an overcast sky might make things bluish, and fluorescent lights might just make everything horrible. Generally we don’t notice this too much, as our eyes and brain work together to tell us what color things are supposed to be, but cameras don’t have this automatic smart filter and so when you get the pictures home and look at them properly you might notice the colors are washed out or wrong.
Fortunately this is easily fixable with something called ‘White Balance.’

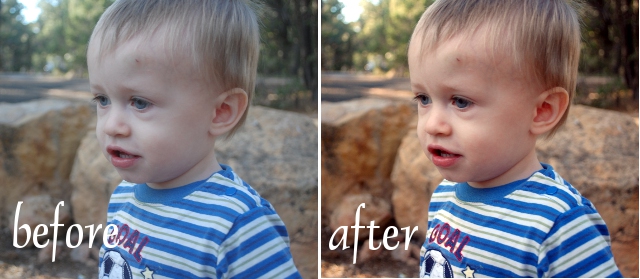
Go to Colors > Auto > White Balance and see the difference. Isn’t that amazing? The shade from the trees made everything washed out and gray, but with the White Balance adjusted this picture is bright and warm and clear. I love White Balance!
Cuts, Zits, and Dirt
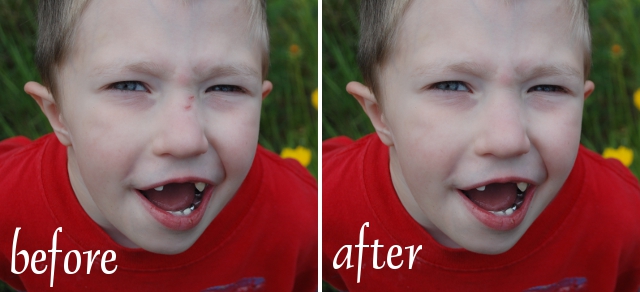
For the most part, I leave cuts and dirt and bruises in the photos of my children. It’s part of their experience. Occasionally, though, I have a picture I want to use for a special purpose, like framing on the wall, or using as the cover image in a pattern, when I don’t really want to see a scab… forever. Also (I’ll admit it) when I get a zit I do not publish it on the internet. I don’t consider this cheating. A zit is a temporary thing, it’s not part of my face, and pictures on the internet are forever. I do try to mess with the natural photo as little as possible, though.

This technique is for small spots, cuts, or smudges. Go to your toolbox and click on the Healing Tool (looks like crossed band-aids). Make sure your brush is small enough that you won’t affect anything but the blemish you’re removing. You can make it larger or smaller on the ‘Scale’ slider. Next, find a piece of skin very close to the blemish that looks like the skin under the blemish would look if it weren’t there. Try to match color and lighting as well as possible. Now press Ctrl and click on the unblemished skin. Release Ctrl and click on the blemish. It may take a few clicks to completely remove it, depending on size and color.
I prefer the Healing Tool to a Clone Stamp, because the Clone Stamp duplicates the source skin exactly and can be noticeable. The Healing Tool uses pixels from the source skin and from the blemished area to make a new patch that integrates with the surrounding picture. …He was a cute four-year-old, wasn’t he?
Cropping
This is more subjective, but it can potentially improve your photos a great deal. Cropping is more than just cutting the pile of unfolded laundry or the crying sibling out of an otherwise cute photo. It allows you to direct your viewer to the ‘best part’ of the picture, to basically decide what the picture is really about. In the picture below, Tommy’s slumping posture (I’m pretty sure he’s saying, “Why are we in the stroller AGAIN?”) is comical, but any time I showed the picture to anyone, I found myself saying “Just look how cute Teddy is in the back, there!” Cropping allows me to make a new image focused on how cute Teddy is being back there. I included the hands since to me that was an important part of the moment.
Once you figure out what to include in the photo, the actual cropping is simple.

Pick the Rectangular Select Tool from your Toolbox. (Gray rectangle bordered by a dotted line.) Use it to select the area you want; you can pull at the corners to make it larger or smaller, and click and drag in the middle to move the selection around. When you’re happy with what’s inside the rectangle, go to the Image menu and select ‘Crop to Selection.’ That’s it! I always recommend saving changes as a new file so you can have the originals should you need them.
Hopefully you’ve learned something today you can use in your own photos!

Thanks for this tutorial! I have GIMP but had no idea how to use it for photo editing until I read this. Now I can fix all of my not so great pictures for free!
Glad I could help!