How to Make Crayons in a Hard Plastic Mold

As part of my plan to use what I had to make Christmas presents, I decided to refashion the oatmeal canister I had of old, broken crayons into new, awesome crayons. We’ve made recycled crayons before, but I used a silicone ice cube tray and the results were less than stellar. The shapes were a little fuzzy, and the tray was permanently stained by the wax. I’ve seen some amazing, crisp, gorgeous recycled crayons around (like on Etsy) and I can now tell you that I’ve discovered the secret: hard plastic molds.

How to Make Crayons in a Hard Plastic Mold

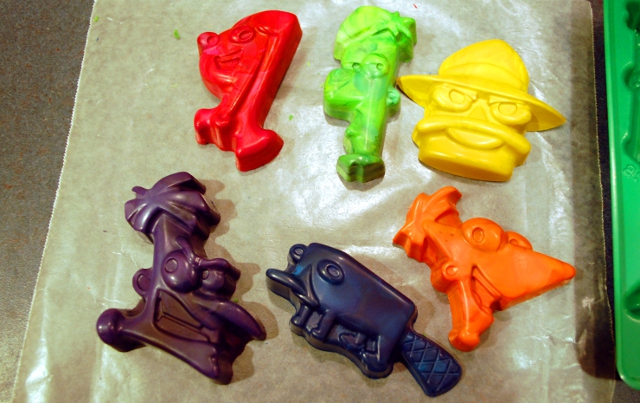
I found the Phineas and Ferb mold in the Jell-o aisle at Walmart for $1. Turns out, it’s actually really easy to use them, and the results are great!

First, you need old empty cans – one for each color you’re going to melt. I saved six so I could make each crayon a different color.

Just some crayons in a can.

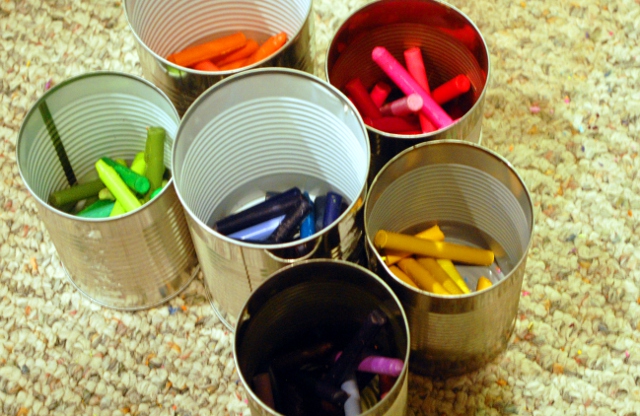
Peel your crayons – this works better with a razor to split the wrappers down the side – and sort them by color. Then, place your cans in a pot with some water. You want enough to cover the bottom of the pot without making your cans float.

Steamy!

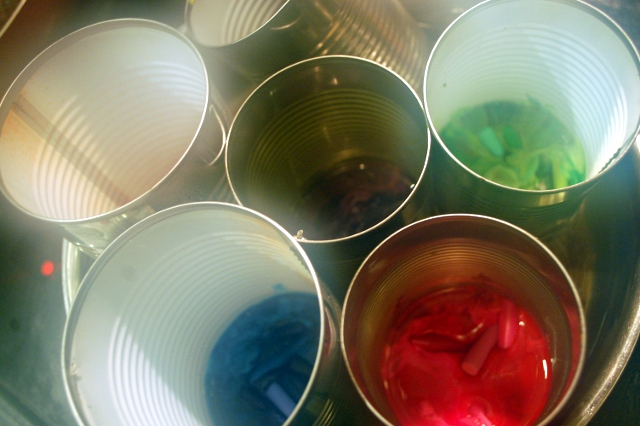
On medium/low heat, boil your water until the crayons are all melted. (CAUTION: do not leave wax unattended.) Be sure that you don’t get any water in the cans either, but it doesn’t take long for the crayons to melt. Once they’re melted, pour carefully into the mold.

Now: we wait.

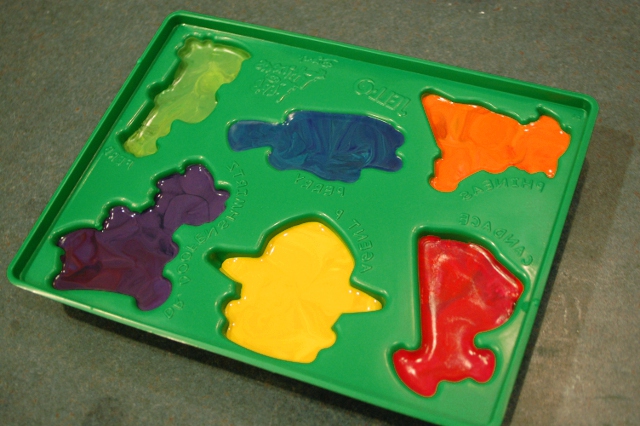
Now you just have to wait for them to cool down and solidify! This can take a while. Once they’re hard, turn the tray over and tap gently to remove the crayons. If any of them are being stubborn, you can put them in the freezer for a few minutes and they’ll pop out really well.

See?

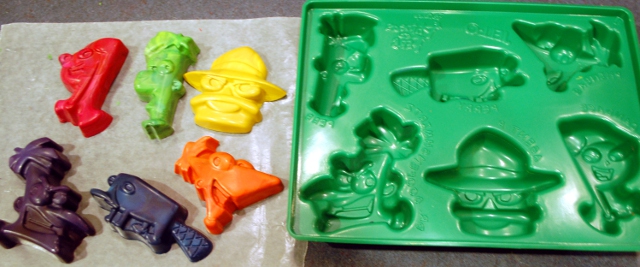
See how clean the tray is?! You could easily make the crayons in different colors the next time without having them stained by the residue of your first try. I would even still use this tray for food! I have to say, now that I’ve tried the hard molds, I’m never going to make crayons in the flexible silicone trays again. The results are just better.

DIY Bookcase Play Kitchen

Well, I suppose it’s time for me to get back to work here! First order of business: showing off all of the awesome Christmas presents that I made for the boys. Up first: something I am ridiculously proud of:

DIY Bookcase Play Kitchen for under $35

I made a play kitchen for Tommy and Teddy! Obviously, if you want to make something similar your final cost is going to depend on the materials you can beg, borrow, or scrounge. I really had thought we could do it for cheaper than $35. Maybe you can!

Here it is ‘before:’

Before: little old lavender bookcase.

We were up visiting my parents and my mother asked, “Would you have any use for this?” It was my little sister’s…back when they painted her whole room purple. Before that, apparently, it was my aunt’s. It was an old, lavender, plywood bookcase, but I had a plan.

Sanding? Nope.

Unfortunately, Plan A went nowhere. After forty minutes with a power sander, all I found was a layer of mint green paint and a tiny bit of wood. Sanding was out. (Probably, this was a bad idea in the first place.)

That left painting.

A little white paint makes a big difference!

This is where a lot of the money went. I spent about $12 on white spray paint. There’s probably a cheaper way to do that, too! Once the purple was all covered in white, though, it was time for the fun part.

DIY Play kitchen sink and stovetop

The whole shelf is only about a foot and a half wide, so I had to use the space wisely.

I had Greg cut a rectangle out of the shelf for me, and punch a pair of holes in the loaf pan I bought for the sink ($1!) so we could screw it in securely. Then I added a pair of silver drawer pulls for the knobs (about $2.50) and a wooden letter “J” ($2.50) which I sanded smooth and painted with some silver craft paint ($2). That’s about $8 for the sink.

For the burners, I bought a pair of red reflectors about 4″ across ($1.50!) and screwed them on. Easy and cheap!

A little extra shelf space!

To expand the play space a bit, I added a little shelf onto the side. I found it at a thrift shop for 50 cents. I used more of the white and silver paint to make it match and screwed it on.

Nice little curtain!

I bought a tiny tension rod ($2!) to go in the bottom part and sewed a little curtain out of cloth I already had.

Here's the microwave.

The microwave was tricky. I bought two little wooden rectangles ($2), some hinges ($2?), a cabinet handle ($1.50), and a little touch light to go inside ($1.50). One of the wooden rectangles was just about the right size to be the door, the other needed to be cut to fit inside the shelf and be a divider. I painted both of them white, then knocked the divider into place with a hammer and glued it into place with some wood glue we had. I painted a silver rectangle on the door, painted the handle silver too, and put it on the door before I put the door on. (I had to put a little piece of scrap wood between the hinges and the shelf to allow the hinge to swing properly.)

It's a nice little microwave!

I may get a little magnet or latch of sometime to help keep that door shut, but for the time being it works just fine. Adding up all of the things I bought (and a packet of wood screws, $1) that’s about $32 we spent on it.

I love how this turned out!

Look how good it looks! It was totally worth it.

They love it!

Tacky Christmas Sweater

I actually took exception to the ‘ugly’ in the Ugly Sweater Contest. The point of an ugly sweater contest is not to have a sweater that is ugly, but one that is so unrestrainedly, over-the-top crazy Christmas fantastic that it defies logic or rational explanation.

At least, that was my take on it.

See? You can't call a sweater this jolly ugly.

To make your own tacky Christmas sweater, you will need:

  • Worsted Weight Yarn – a lot of it. I used the better part of 3 skeins of Red Heart Super Saver (the 7oz skeins)
  • Fun Fur (optional)
  • K/10.5 (6.5mm) hook
  • Glue gun and plenty of hot glue
  • Pompoms
  • Felt
  • Cotton balls or batting
  • Silver cord or similar

Obviously, once you have the basic sweater you can decorate with whatever you have on hand, but this is what I used.

Size: Men’s Large

Finished Measurements: Chest: 38″ circumference, Length: 25″

My gauge was 9 sts/ 6 rows = 4″ in dc.

Body
Rnd 1: Ch 60, join to form loop. Ch 2, dc in each ch around. (60 dc) Join.
Rnd 2: Ch 2. Dc in each dc around. (60 dc) Join.
Rnd 3: Ch 2. *Dc in each of the next 2 dc, ch 1. Repeat from * around. (90 sts) Join.
Rnd 4: Ch 2. Dc in each dc and ch-sp around. (90 dc) Join.
Rnd 5: Ch 2. *Dc in each of the next 3 dc, ch 1. Repeat from * around. (120 sts) Join.
Rnd 6: Ch 2. Dc in each dc and ch-sp around. (120 dc) Join.
Rnds 7-12: Ch 2. Dc in each dc around. (120 dc) Join.
Rnd 13: Ch 2. *Dc in each of the next 3 dc, dc inc in next st. Repeat from * around. (150 dc) Join.
Rnds 14-18: Ch 2. Dc in each dc around. (150 dc) Join.
Rnd 19: Time to make the armholes! Ch 2. Dc in each of the next 42 dc. Skip 33 dc, dc in each of the next 42 dc. Skip 33 dc, join rnd with first dc made. (84 dc)
Rnds 20-36 or desired length: Ch 2, dc in each dc around. Join.
Finish off.

Sleeves
Rnd 1: Join at underarm, ch 2. Dc in each st around, placing extra stitches as needed where sleeve meets body. (I added four.) Join rnd. (37 dc)
Rnd 2: Ch 2. (Dc dec), dc around until 6 sts reamin. (Dc dec), dc 4. Join. (35 dc)
Rnd 3: Ch 2. (Dc dec), dc around until 6 sts remain. (Dc dec), dc 4. Join. (33 dc)
Rnd 4-18: Ch 2. Dc in each dc around. (33 dc) Join. (I changed color for round 6.)
Rnd 19: Ch 2. Dc around, evenly spacing 4 decreases. (29 dc) Join.
Rnd 20: Ch 2. Dc around, evenly spacing 4 decreases. (25 dc) Join.
Rnd 21: Ch 2. Dc around, evenly spacing 4 decreases. (21 dc) Join.
Rnd 22: Ch 1. Sc in each st around. (21 sc) Join, finish off.

Repeat for second sleeve.

Weave in all ends.

To tack-ify your sweater, use your imagination! My boys and I wound silver cord all the way around the yoke and cut multi-colored lights out of felt. We used the glue gun to attach them and hold the cord in place. Then we glued on felt snowflakes and our felt gingerbread man, with pompoms for ‘ornaments’ and smaller snowflakes as well as the features on the gingerbread man. We glued on cotton balls for the snow, but I think some quilt batting would have held up better. For the ‘garland’ on the sleeves I held three strands of yarn (including some green Fun Fur) together and made a chain with my biggest hook. Then, a little hot glue had it stuck on in no time.

See? Nothing to it!