Crafting Spring Flowers

Spring is creeping in over here. Last week we even had one day where the boys were running around outside barefoot in shorts and t-shirts! So, when we wanted to cheer up someone who wasn’t feeling well, it was easy to think of what to do.

We made her some flowers!

A flower garden inside.

The kids had a lot of fun helping me cut out the shapes and glue our flowers together. It’s really simple to make your own spring blossoms!

Hyacinths

How to Make Paper Hyacinths and More Flowers

To make a hyacinth, simply make a tall, puffy ‘cloud’ shape in purple, pink or white, a long green rectangle for the stem, and two long, pointed leaves. Glue it together, and presto! A hyacinth.

Tulips

How to Make Paper Tulips and Other Flowers

For tulips, cut a fat teardrop with a zigzag top for the blossom (you can use pretty much any color you like for tulips, we used yellow and red.) Then cut a very long, thin green stem and some elongated teardrops for the leaves.

Daffodils and Paperwhites

How to Make Paper Daffodils and Other Flowers

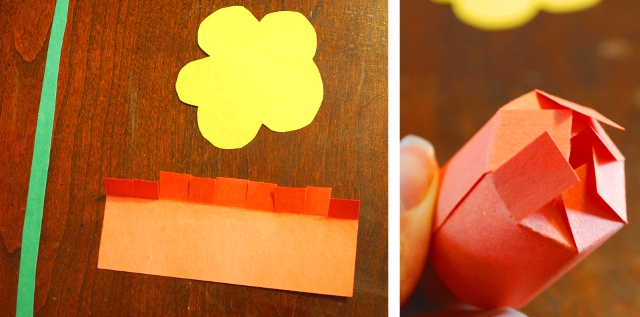
For the daffodils, we cut a sort of daisy-shape out of yellow for the petals, a long orange rectangle for the trumpet, and a very long, thin green rectangle for the stem. The trumpet, of course, is the trickiest part to construct. Make sure your rectangle is long enough that when you wrap it into a circle it’s as big as you want it. Fold over the bottom of your rectangle and cut regular slits into it up to the fold line so that it will fold into itself when you curl it. Then, glue the ‘tube’ together at the edge, and glue the whole thing to the center of the petals.

How to Make Paper Daffodils and Other Flowers

The paperwhites are made with the same construction; just a bit smaller (and, of course, with white petals). These were the trickiest to make, since the trumpets were so small, but I think they were some of the best-looking flowers we made.

How to Make Paper Whites and Other Flowers

Hooray for Spring!

How to Draw Agent P in 5 Steps

My kids love Phineas and Ferb (especially Perry the Platypus/Agent P). They’ve gotten really good at drawing Perry as a platypus, but when they tried to draw him as a secret agent they just couldn’t figure out what to do. We looked online for ‘How to Draw Agent P,’ but after we tried this “super easy” 4-page 20-step tutorial and ended up with knots of unerased lines, we decided we needed something easier.

This tutorial is probably not great for someone looking to make an exact, professional-looking art piece, but if your five year old just wants to draw an Agent P picture, this should help.

1. Start with a standing-up rectangle.

Step 1 - How to Draw Agent P in 5 Steps

2. Add arms and legs.

Step 2 - How to Draw Agent P in 5 Steps

3. Draw the hat and some sneaky secret-agent eyes.

Step 3 - How to Draw Agent P in 5 Steps

4. Add Agent P’s beaver-tail and bill!

Step 4 - How to Draw Agent P in 5 Steps

5. Erase any extra lines and draw the criss-crosses on his tail.

Step 5 - How to Draw Agent P in 5 Steps

Not pictured here is step 6: color! The kids had much better results with this kind of ‘whole picture’ approach than sketching armatures. Hope you enjoyed it!

Refresh Your Coloring Books in Minutes

I have a chronic coloring-book-overflow problem at my house. I buy them at the dollar store, the kids are always excited to see a new one, and they get used for months. (Best use of a dollar ever? Possibly.) However, once you get enough coloring books you start to have a serious storage problem. Add to that the fact that once a book has been more than half-filled with scribbles, the kids suddenly lose interest in it, and you have more than enough reason to start periodic “refreshing.”

Refresh Your Coloring Books in Minutes

Refreshing your coloring books is simple, but very effective. About once a year I take half an hour and go through all the coloring books and tear out any pages that have been scribbled on both sides, any games that have been played, etc. (I’ve just started leaving in ones that have been colored very nicely, because Max and Charlie are old enough that they’ve started coloring neatly and they like to go back and look at what they’ve done.) All of a sudden, a coloring book that had “nothing” left to color or do is full of clean pages! The kids’ interest is engaged again, the coloring books take up less space on the shelf, and it helps me to see which coloring books have been used so completely they should go to the trash instead. It’s just a simple little thing, but it makes a big difference!