
I finished the project I was working on with the Baby Alpaca Brush – it was mostly finished before we took our trip to Colorado, but I didn’t think it would be very good to work on in the car, since I needed to keep trying it on to judge the length. It’s finished now, though, and I like it. It’s warm and soft and fuzzy.  It reminds me of hedges, cool cloudy weather, and good literature – hence the name. (It makes sense to me, anyway.)
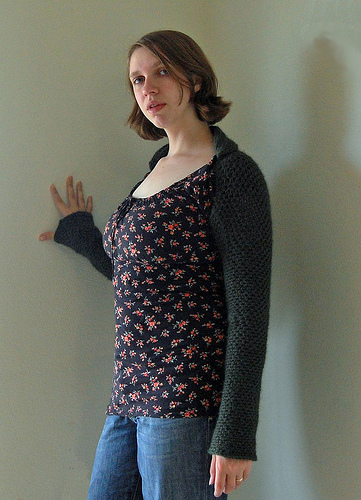
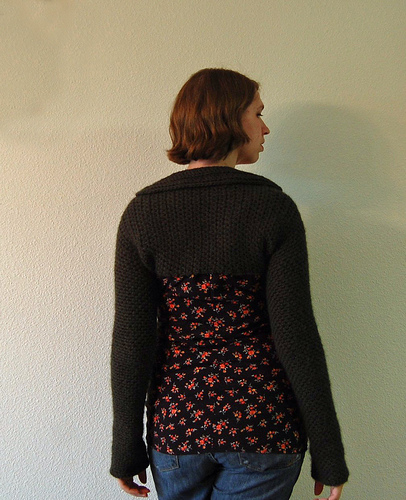
The shrug is worked from cuff to cuff in the round, so the only seaming involved is attaching the collar. Instead of just being a long straight tube, a little bit of shaping is used to get a better fit and to eliminate the bumpy, bulging back that you see so often with simple shrugs. I don’t feel like writing up a proper pattern for it, but I thought I’d share some guidelines that will allow you to make one of your own.
Materials:
- 5 balls Plymouth Baby Alpaca Brush, [80% Baby Alpaca, 20% Acrylic, 110 yds per 50g ball]
- J/6mm hook
- Yarn needle
- Safety pins or stitch markers
When you begin, be sure to take notes so that you can make the second sleeve match the first! Start by making a chain long enough that when you join it into a circle, if you push it up on your arm like a bracelet it fits up your arm and stops at your elbow. (My number was 35 ch.) To accommodate the pattern stitch, be sure you use an odd number of chains.
Join, ch 2, and hdc in every st around. Join rnd.
Ch 1, sc in next st, *ch 1, sk 1 st, sc in next st. Repeat from * around. When you reach the end of the round (the first and last stitches should both be sc), **ch1, skip next sc, sc in next chain space. Repeat from ** around in a continuous spiral until sleeve measures desired length from wrist to elbow. (It’s a good idea to measure and mark down the length of this section, even put in a stitch marker for later.)
At this point, increase until sleeve can continue comfortably up your arm. (I made 3 increases. Be sure to mark down how many increases you made so that you can mirror them on the other side with decreases.) Increase by making [sc, ch 1, sc] in a chain space. Stack your increases by increasing in the ch-space formed in the previous increase. Only make one increase per round to avoid creating strange bumps. Insert stitch marker.
Continue in pattern until your sleeve reaches the bicep. Increase as described previously until sleeve can go comfortably over bicep and shoulder. (I made 10 increases here: be sure to make a note of how many increases you did.)
Begin working back and forth, leaving a few stitches (I used 3) unworked to create some space between the edges. Work in pattern for about 1 1/2″; any time the pattern stitch would have you begin or end a row with a ch, substitute a sc. Choose one side to be the neck edge, and one side to be the back edge. Begin decreasing at back edge as follows: insert hook in ch-space, pull up loop. Insert hook in next ch-space, pull up loop. Yarn over, pull loop through all loops on hook. Make a decrease in this manner every row along ‘back’ edge until (when you try it on) the end of the row has come out from under your armpit to sit on your back. Make note of the number of decreases (I made 6), insert stitch marker.
Work even in pattern until reaching the place on the opposite shoulder that mirrors where you placed the last marker (be careful, it’s easy to make this part too long) and increase along ‘back’ edge as previousy explained to match your decreases. Work even about 1 1/2″, chain the same number of stitches you skipped before, and join your work. You should now have the same number of stitches as you did before you split your round.
Work 1 round in pattern, decrease as previously described to match the bicep increases on the other side. Work straight until you reach the place equivalent to the stitch marker on the other arm (just above the elbow), decrease to match elbow increases. You should now have the same number of stitches as you began with; work straight in pattern until second sleeve is about 1/4″ shorter than first sleeve. Join with a slip stitch, ch 2, hdc around, join rnd. Finish off.
Collar:
Row 1: Ch 32, make 2 hdc in 3rd ch from hook. Hdc across, make another hdc in last ch. (32 sts) Turn.
Rows 2-5: Ch 2, hdc inc 2x. Hdc across until 2 sts remain, hdc inc 2x. Turn.
Row 6: Sl st 3, sc inc, hdc inc, hdc across until 5 sts remain. Hdc inc, sc inc, sl st. Turn, leaving remaining sts unworked.
Row 7: Do not ch, skip sl st, sl st 2. Sc inc, hdc 38, sc inc, sl st in next st. Turn.
Row 8: Skip sl st, sl st 3. Sc, hdc 32, sc, sl st. Finish off.
Center collar on neck edge, and sew flat side of collar to neck edge. Weave in all ends.
And that’s it! I hope someone finds this useful.
Darn this work computer with it’s dark screen! I can’t see that what I am assuming is a beautiful shrug!
Oh that is lovely! Now can you just design a cardigan with the same sleeves and collar for me, please? LOL
Beautiful! This is the first shrug pattern I’ve ever seen that I really like!
I love this! I’m gonna have to check my stash and see what I have that would make this look smashing…thanks so much for sharing!
Useful?! I find it delicious. Time to go stash-diving!
This is a beautiful design, thank you for sharing!
I love the collar and the cuffs !
It’s funny that you called it a baby prison. We call anything that can contain a child a baby prison, too! I’m glad you had fun at the fiber festival! We missed ours.
I love it ! Thank you for posting this pattern.
Its so great! I’m making my own but I have a problem with the directions
Begin working back and forth, leaving a few stitches (I used 3) unworked to create some space between the edges. Work in pattern for about 1 1/2″; any time the pattern stitch would have you begin or end a row with a ch, substitute a sc. Choose one side to be the neck edge, and one side to be the back edge. Begin decreasing at back edge as follows: insert hook in ch-space, pull up loop. Insert hook in next ch-space, pull up loop. Yarn over, pull loop through all loops on hook. Make a decrease in this manner every row along ‘back’ edge until (when you try it on) the end of the row has come out from under your armpit to sit on your back. Make note of the number of decreases (I made 6), insert stitch marker.
Do you work in the 1 1/2″ and THEN start decreasing, or do you do it on the same round?
Thank you!
This is hot! I love it. Can’t wait to wear it or should I say…be sexy in it. motivation to get crochetin’…..lol.
Having similar difficulty as previous comment by Katie posted on Sept. 19, 2009. Not sure what you mean by “leaving a few stitches (I used 3) unworked to create some space between the edges”. What edges? Can you clarify this for me?
Basically leaving some stitches unworked leaves room for the underarm. (The ‘edges’ I referred to are the top and bottom edge of the piece that goes along your back.)
Hi Melissa…My daughter who hates everything crochet actually asked me to make her this! I was amazed. It just might be a turning point for her, lol. The thing is we don’t live near each other so I can’t make it the way you described by fitting to each part of the arm etc. If you don’t mind, in email if you prefer, could you tell me what size you wear? You look to be about her size. If you are both the same size I can just follow what your increases & decreases are. I can adjust some on my own if you aren’t the same size. Thanks!
Is there anyway you could convert this to knit? YO’s should do the trick. I just love it and would love to make it for some family members for Christmas and Birthday gifts. (Very large family! LOL) I could give it a go, as I am beginning to get a taste for designing (I find it more satisfying, well that is when you finally get the garment all done and finally correct and fudged a little – shhhhh LOL) If I do I will send it to you to post here as a knit version as I am sure you will change it a bit…and I don’t mind if you call it yours if you have to make changes then you did add your flavor to it.
Love this site I found it today and have been on it all morning! God bless you and yours, have fun with the triplets once the arrive – or have they already…well my congrats and blessings to the new family! Take care.
Cute Shrug! Thank you for announcing up front that you’re LDS. I am too, and it’s very refreshing to find someone else that lets people up front.
That might be a pretty shrug I will have to try too since you had provided the tips. I am hoping to create unique shrug I could. More power to this site and God bless.